
SURPG controls and keybinds
Find your device inputs, distinguish movement and combat actions, and reassign buttons in SURPG.
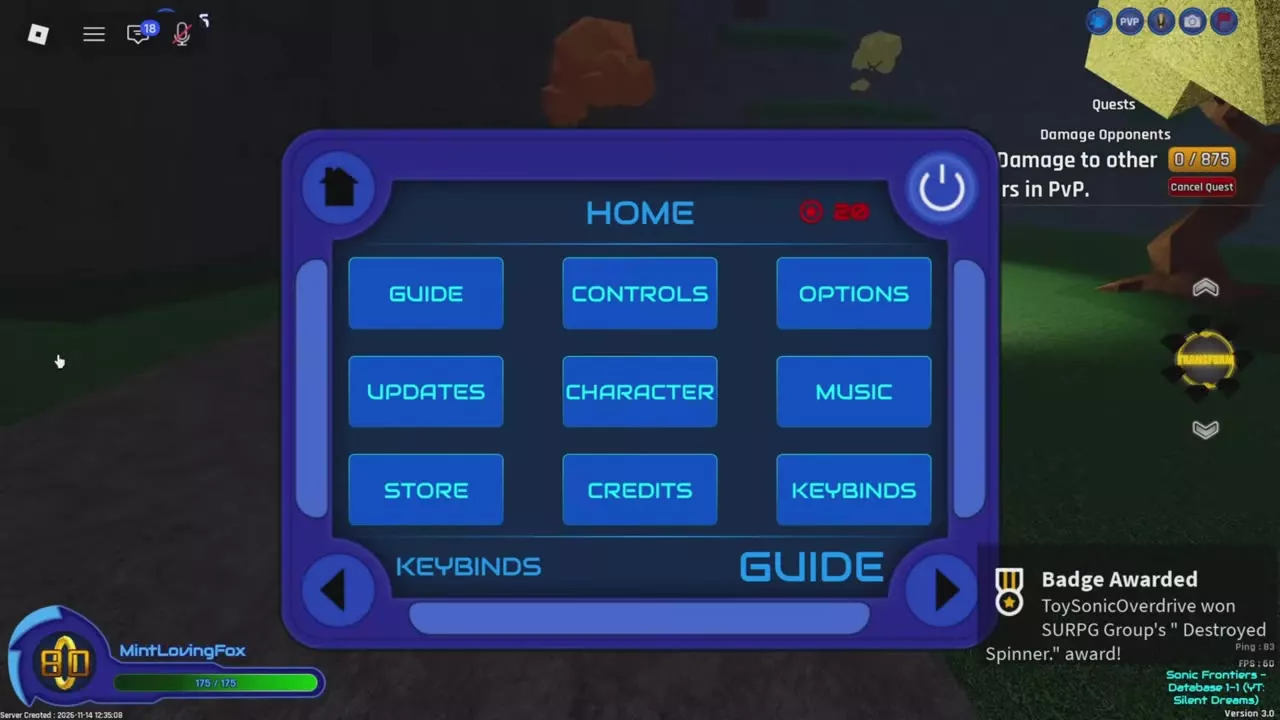
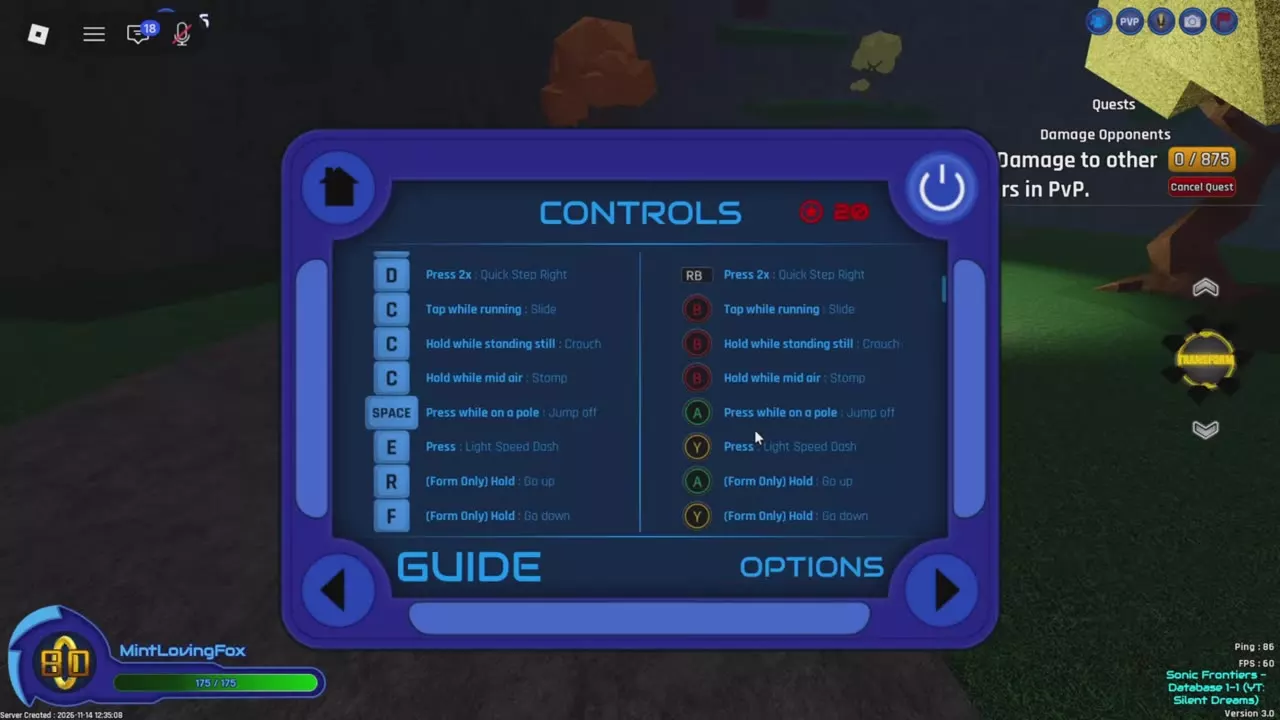
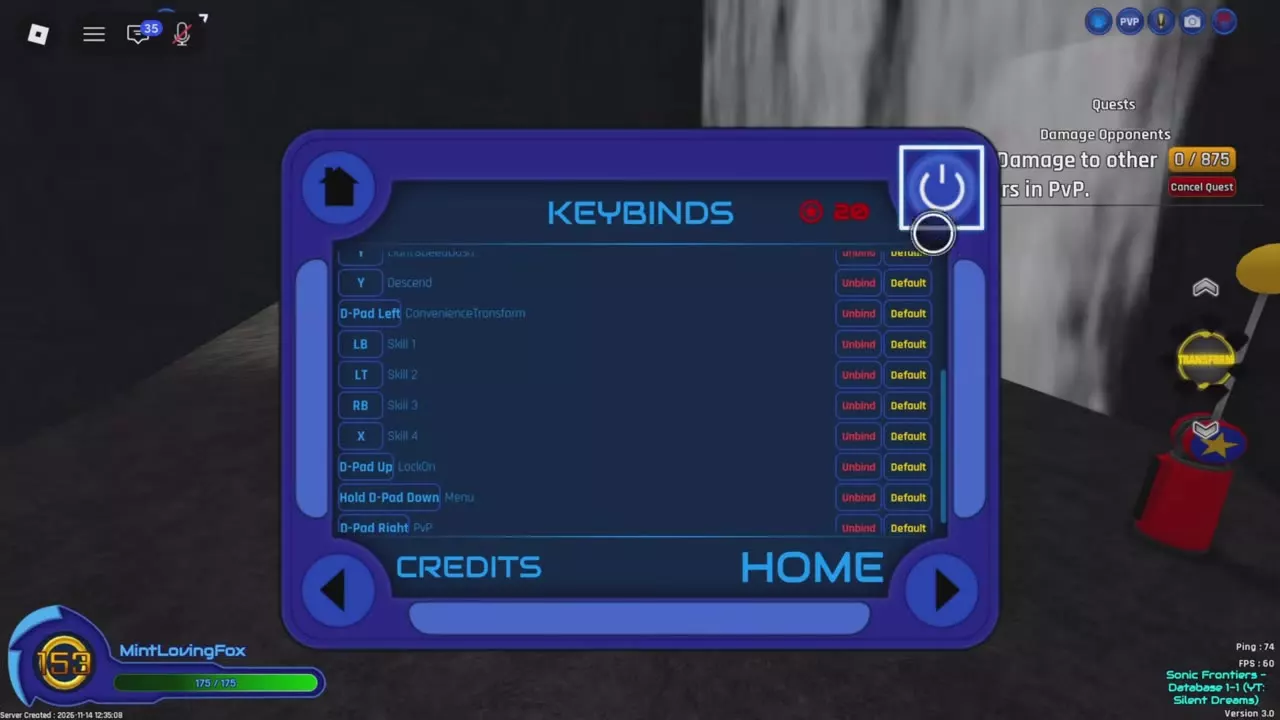
Open Menu > Home > Controls for action instructions. Open Home > Keybinds and choose Keyboard or Controller to inspect or change your bindings. Assigning a button already used by another action unbinds that action; give it a replacement before leaving the menu.
Controls and Keybinds menus
Open Menu > Home and choose the menu for your task:
- Controls explains how to perform actions, with keyboard and controller instructions side by side.
- Keybinds displays assigned inputs and lets you change them. Select Keyboard or Controller, then scroll to the action.
Read the action's state requirement as well as its button. Standing still, running and being airborne change what the shared C/B input does. Flight instructions apply in Form mode; skill instructions in Controls are marked for PvP.
For flight and controller direction-pad actions, Controls and Keybinds contain different mappings. Use the assignment in your selected device's Keybinds list when performing or remapping those actions.
Movement input directory
Use the directory to look up Boost, Homing Attack, Quick Step, Crouch, Slide, Stomp, rail grinding, wall climbing and Shift Lock. Expand an action for its touch input, state requirements and related actions.
Controller labels distinguish Xbox A / PlayStation X for Jump and Homing Attack from Xbox X / PlayStation Square for Boost. B / Circle is the Stomp input, and LB/RB / L1/R1 are the left and right shoulder buttons.
10 objects
| Name | Keyboard input | Controller input | Use |
|---|---|---|---|
|
Hold Q
|
Hold X / Square
|
Faster movement
| |
| |||
|
Double-tap Space
|
Double-tap A / X
|
Targeted traversal
| |
| |||
|
Double-tap A / D
|
Double-tap LB / RB
|
Rapid sideways movement
| |
| |||
|
Hold C
|
Hold B
|
Stationary crouching
| |
| |||
|
Tap C
|
Tap B
|
Sliding and wall breaking
| |
| |||
|
Hold C
|
Hold B / Circle
|
Break cracked floors
| |
| |||
|
Skill 4 binding
|
Skill 4 binding
|
Timed Spin Dash counter
| |
| |||
| — | — |
Follow and switch rails
| |
| |||
| — | — |
Reach upper platforms
| |
| |||
|
Left Ctrl
|
D-pad Down
| — | |
| |||
Movement inputs by device and movement state.
9 objects
|
|
Hold Q | Hold X / Square Hold-to-boost controller scheme | Faster movement |
|---|---|---|---|
|
An acceleration action used to increase movement speed.
TipsUse Boost while grinding to increase rail speed. Sonic Wind disables Boost while the skill is active. |
|||
|
|
Double-tap Space | Double-tap A / X | Targeted traversal Near a compatible target |
|
A movement attack that homes toward compatible nearby targets. It is used for gap crossings and grabbing poles.
TipsApproach a compatible target before double-tapping Jump. Use the green pole marker to line up a grab. |
|||
|
|
Double-tap A / D | Double-tap LB / RB | Rapid sideways movement |
|
A rapid sideways movement used to shift left or right around obstacles.
TipsLine up with the next open side of the spike road, then change sides as the gaps alternate. |
|||
|
|
Hold C While stationary | Hold B While stationary | Stationary crouching While stationary |
|
A stationary low-posture action that shares its input with Slide and Stomp. |
|||
|
|
Tap C While running | Tap B While running | Sliding and wall breaking |
|
A running action that shares its input with Crouch and Stomp. It is one of the actions used to break certain walls. |
|||
|
|
Hold C While airborne | Hold B / Circle While airborne | Break cracked floors Above a stompable floor |
|
An airborne movement action used to break cracked floors.
TipsGet airborne above a cracked floor before holding the Stomp input. |
|||
|
|
— | — | Follow and switch rails |
|
A traversal action that carries the character along a rail. Nearby rails can be reached by switching sideways.
TipsStep onto a rail, Boost to accelerate, and move sideways when another rail is nearby. |
|||
|
|
— | — | Reach upper platforms Arrow-marked wall passages |
|
An upward traversal through the tutorial's arrow-marked wall section.
|
|||
|
|
Left Ctrl | D-pad Down Revised console scheme | — |
|
A camera-control option with keyboard, controller, and mobile inputs.
|
|||
Flight, skills and controller schemes
Jump, abilities and menu inputs
These are the action-guide inputs unless the row identifies Keybinds. Controller buttons below use Xbox labels.
| Action | Keyboard | Controller | Condition |
|---|---|---|---|
| Jump | Space | A | — |
| Jump off a pole | Space | A | On a pole |
| Turbo Boost | Tap T | Press left stick | While boosting |
| Light Speed Dash | E | Y | Ability use |
| Transform | G | D-pad Left | — |
| Toggle PvP | P | D-pad Right | — |
| Menu | M | Hold D-pad Down | Keybinds list |
Start Boost before pressing the Turbo Boost input. Use the current replacement button if you have changed either binding.
Form flight
| Action | Keyboard: Controls | Keyboard: Keybinds | Controller: Controls |
|---|---|---|---|
| Rise | Hold R | E | Hold A |
| Descend | Hold F | R | Hold Y |
| Land | Tap F | — | Tap Y |
The keyboard Controls guide gives R/F flight instructions, while Keybinds assigns E to Rise and R to Descend. E is also listed for Light Speed Dash. Use your assigned flight actions while in Form mode rather than treating R/F as a universal mapping. The Controller Keybinds list also assigns Y to Descend.
PvP skills and target lock
| Action | Keyboard: Controls | Controller: Controls |
|---|---|---|
| Skill 1 | 1 | LB |
| Skill 2 | 2 | LT |
| Skill 3 | 3 | RB |
| Skill 4 | 4 | RT |
| Target lock | L | D-pad Down |
The keyboard Keybinds list includes Skills 1–6 on number keys 1–6. Controls gives the four skill inputs above under PvP. A skill's assigned button follows its slot; use the replacement binding after a remap.
The Controller Keybinds list assigns D-pad Up to LockOn, unlike the D-pad Down instruction in Controls. L remains the keyboard target-lock input.
Direction pad and console schemes
| Scheme or menu | Boost | Turbo Boost | Shift Lock |
|---|---|---|---|
| Revised console scheme | Hold X | Press L3 while boosting | D-pad Down |
| Legacy console scheme | Toggle with X | Hold Boost button | L3 |
| Controls guide | Hold X | Press left stick while boosting | D-pad Up |
L3/LS means pressing the left stick. The revised scheme and tutorial use D-pad Down for Shift Lock. Controls instead lists D-pad Up for Shift Lock and D-pad Down for target lock; Controller Keybinds lists D-pad Up for target lock and holding D-pad Down for Menu. Match the action to your selected scheme and current binding.
Select the legacy console mapping in Menu > Options to use toggle Boost, hold-to-activate Turbo Boost and L3 Shift Lock. This option was introduced for new servers in the December 6, 2025 update.
In the older 2.2e Mini controller scheme, Y locks onto a target and L3 toggles PvP.
Controller Quick Step prompts
Controls and Controller Keybinds specify double-tap LB for left and double-tap RB for right. The tutorial prompt says to press LB/L1 or RB/R1. Follow the double-press assignment when using those Keybinds entries.
Mobile tutorial controls
Use these touch controls for the tutorial actions:
- Shift Lock: tap the lock button at the lower right.
- Boost: start moving, then tap Enable Boost to accelerate.
- Homing Attack: double-tap the jump button. Be near a compatible target to home toward it.
- Quick Step: tap the left or right Quick Step button to shift sideways.
- Stomp: get airborne above a stompable cracked floor, then hold the Stomp button to break it.
Change a binding and repair a conflict
Assign a new input
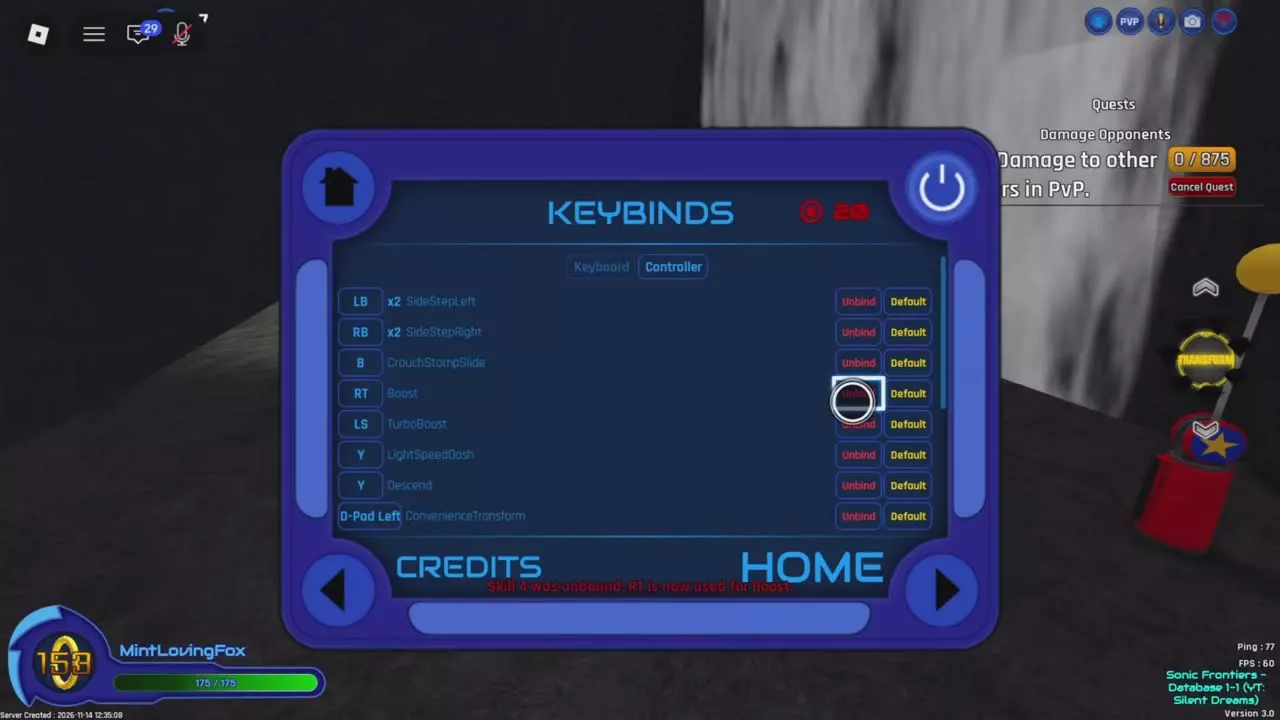
- Open Menu > Home > Keybinds.
- Select Keyboard or Controller and scroll to the action.
- Select its binding box to enter a new input. To remove an existing assignment first, choose Unbind, then select the box.
- When Press a button... appears, press the new key or controller button.
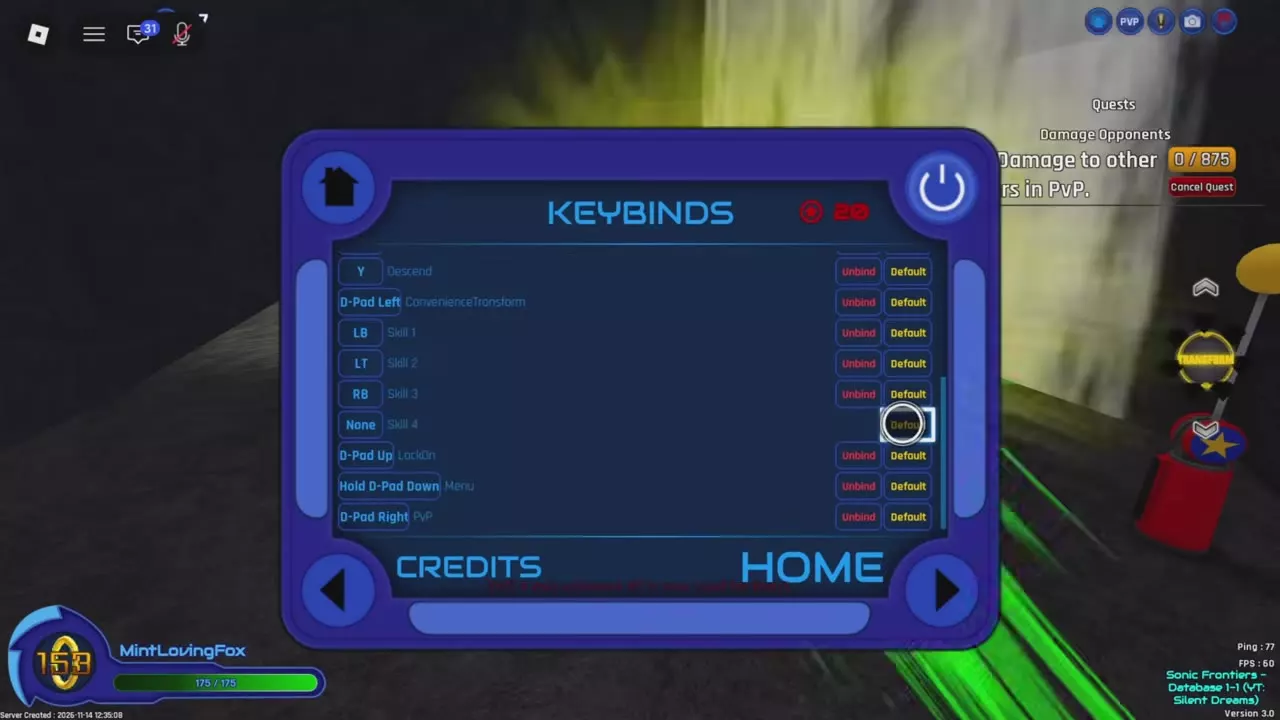
- If that button belonged to another action, find the displaced action and give it a replacement. Its binding becomes None when the button is reassigned.
Each action row includes Unbind and Default buttons.
Swap controller Boost and Skill 4
With Boost on X and Skill 4 on RT, perform the full swap:
- Select the Controller tab and find Boost.
- Choose Unbind to remove X from Boost.
- Select Boost's binding box and press RT. Boost now uses RT, and the conflict message says Skill 4 was unbound.
- Scroll down to Skill 4. Its box reads None.
- Select that box and press X when prompted.
The completed setup is Boost on RT and Skill 4 on X. Assigning RT to Boost does not automatically move Skill 4 to the freed X button.
Movement and combat
- Use movement and parkour mechanics to connect inputs with rails, poles, breakable surfaces and obstacle routes.
- Use ability controls and Ring Capsule unlock for ability prerequisites, Turbo Boost, Light Speed Dash and Chaos Control.
- Use PvP rules and combat moves for participation conditions, target locking, skill restrictions and cooldown feedback.